
Basketball Court Diagram for Plays: Weekly Coach Workflow
A practical weekly workflow for coaches: turn basketball court diagram for plays into practice plans, PDFs, and video playlists to prep, teach, and scout.
Key takeaways
- Define a clean diagram as your weekly blueprint; annotate player movement paths, dribble lines, and screens for execution.
- Export to PDF and label players clearly; shareable link with assistants to keep everyone aligned.
- Attach relevant video clips; tie action timing to the drill sequence for practice.
- Use scouting notes to adjust diagrams weekly; prevent drift between the whiteboard and live reps.
- Define weekly objectives as 2-4 core plays mapped on court diagrams for clear timing.
Practical workflow step: turning a diagram into on-court execution
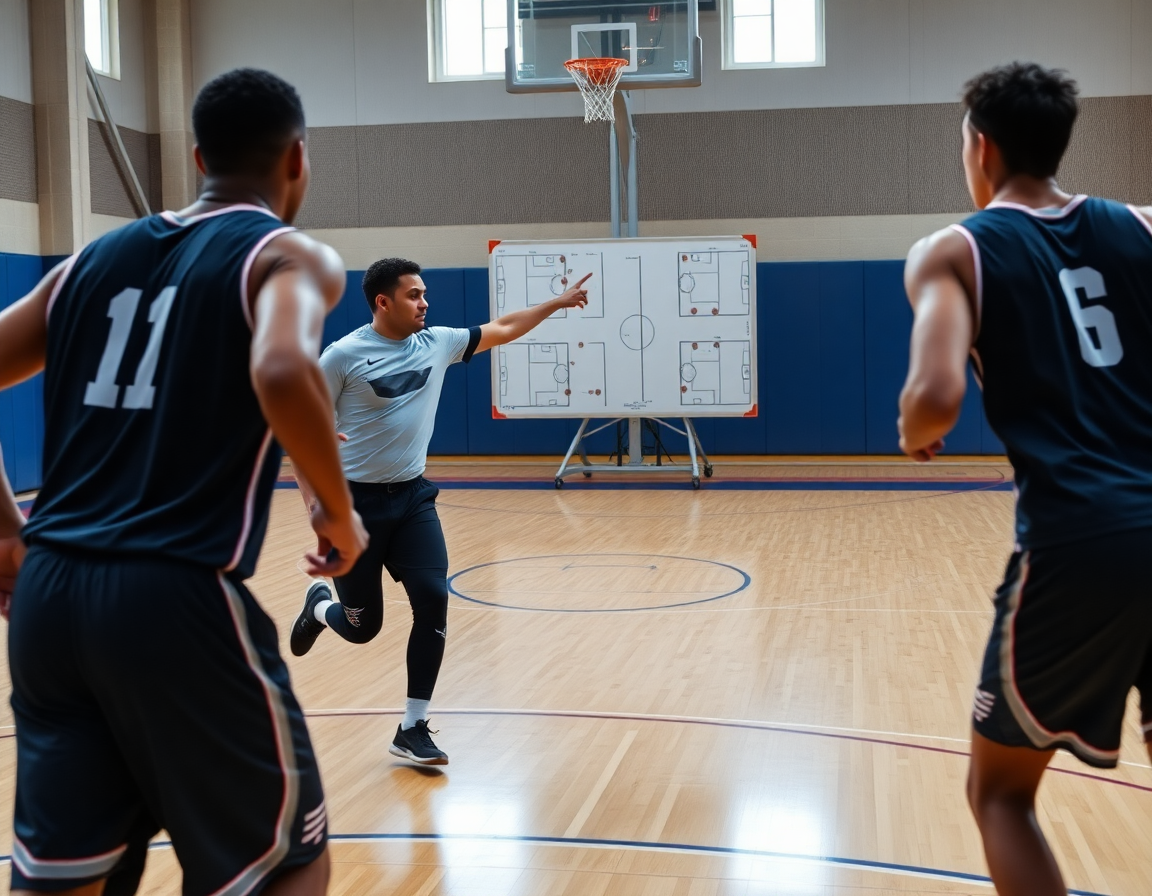
Here's how the weekly workflow looks in practice: start with a clean diagram in the whiteboard, annotate movement and actions, and map it to a corresponding drill sequence in your weekly plan. I jot player movement paths, dribble paths, passing lines, and where screens and handoffs occur. The diagram becomes your blueprint for on-court execution, guiding reps from warmup through the live period.
Export the diagram to PDF for sharing with assistants and players; label players clearly (1-5 or positions) for quick reference. That label helps the staff cue ball handlers and defenders during the reps. Having it in PDF lets you circulate it before practice and keep a clean, shareable version in the plan while you tweak details in the moment.
Attach or link relevant video clips to the play so players can review the action outside practice. A short clip showing timing of cuts, screens, and passes reinforces the diagram and helps players see how the movements translate to restricted spaces on the court. Tie the clip to the exact drill sequence in the plan so the action isn’t just diagrammed, it’s practiced.
Use scouting notes to adjust the diagram for upcoming opponents and update the plan accordingly. A few tweaks to align with a team’s tendencies keep your diagram relevant week to week and prevent drift between the whiteboard and live reps.
Create a shareable link to the diagram for quick access across the coaching staff. Each diagram can be linked to drills, scouting notes, and player playlists for a cohesive weekly workflow, ensuring everyone stays in sync—from the plan to the half court and back.
Define weekly play objectives with court diagrams
Each week, I define our weekly play objectives by selecting 2-4 core plays to develop. I map them on court diagrams to visualize spacing and timing—seeing where players stand, when cuts happen, and where to place shot markers for scoring opportunities. We start with interactive court diagrams on the half court to lock in movement paths and passing lines, then expand to full court looks as timing tightens. The goal: a clean, visual plan that guides every practice rep.
I then build a library of diagrammed plays inside our Practice Plans so you can reuse and update them as personnel or philosophy shift. Each diagram links to a drill in the plan, so a single diagram can drive multiple sessions in a week. We tag elements like player movement paths, dribble paths, passing lines, screens and handoffs, and shot markers, making it easy to pull up the exact sequence when prepping for scouting notes or a quick video clip.
Align the diagram objectives with our offensive philosophy and anticipate the defensive counters. Use the weekly diagram set to guide drills, sessions, and scouting notes, and connect them to player playlists for targeted development. For example, a Horns action diagram on half court can be run in two drill blocks: first, clean up spacing and timing with a quick pass series; second, add the read against a shown defense. After practice, export the diagrams to PDF and share with assistants or players via a link, keeping everyone synced for the week.

Choose the right court layout for the week
Choosing the right court layout for the week starts with tempo and progression goals. If you want to push pace and pressure on defense, lean toward a full court setup; for situational installs or controlled progression, a half court diagram often fits better. When you design your basketball court diagram for plays, you’re shaping spacing, timing, and decision points that your players will rehearse in the plan for the week.
Adapt diagrams for different court formats such as half court, full court, and baseline out of bounds sets to simulate in-practice scenarios. The choice guides how you pace reps and how much space you allocate for each action. The baseline out of bounds layout, in particular, can emphasize catch-and-pass timing and quick-trigger play from the sideline.
Layout choice affects spacing, timing, and player movement paths. A full court layout nudges your players into longer dribble paths and more direct passing angles, while a half court keeps options tighter and requires quicker reads. Think about passing lines, and the rhythm of screens and handoffs as you sketch the diagram. When you map plays to space, you’ll see how shot markers indicate where to look for open looks.
Workflow note: In your plan for the week, mark the selected layout on the tactical whiteboard, attach a short video clip illustrating the setup, and link the diagram to scouting notes and player playlists.
Symbolology and action notation you can rely on
To build a reliable basketball court diagram for plays, start with a shared symbol language. Use offensive circles to represent players (1-5) and X’s for defenders on the floor, with shot markers to note where shots come from. In your weekly plan, keep these diagrams clean on a half court or full court canvas, so players can read them at a glance during timeouts or drills. The goal is quick recognition: ball handlers see their options, defenders track rotations, and the coach communicates clearly.
Actions are indicated with simple marks: passes, dribbles, cuts, screens, and shots. Clear action labels help teammates link movement to outcomes. For example, a Give and Go should be drawn with a quick pass line to the passer, followed by a cut by the recipient. A Pick and Roll uses a screen by the adjacent teammate and a roll path toward the basket. Keep variations consistent across diagrams so screen variations and handoffs read the same on every sheet.
When you stay consistent, players can read diagrams quickly in timeouts and drills. The same vocabulary translates to our interactive court diagram, where you can toggle between half court and full court views, see player movement paths, dribble paths, and passing lines, and track shot markers. This consistency reduces confusion, helps your X's and O's stay aligned, and keeps your scouting notes and playlists in sync with the play.
During a typical weekly workflow, I diagram a Give and Go at half court, link it to a drill in the plan, attach the scouting note about the opponent's ball handlers, and send a player playlist with relevant shot markers. When practice starts, the team can reference the diagram on the whiteboard and immediately translate the action into live reps. The result is faster execution and fewer miscues in the opening minutes of the scrimmage.
Turn diagrams into shareable PDFs and printable resources
At the end of the weekly plan, I export diagrams as a PDF download for easy distribution to assistants and players. The PDFs aren’t just static images—they label half court and full court looks, map out shot markers, and highlight passing lines so everyone understands the intent before we hit the floor. If a player misses a cue, we open the printable court diagrams on a tablet, walk through spacing in 3-step sequences, and make adjustments on the fly. That consistency keeps us aligned no matter who’s charting the drill.
Printable court diagrams become the backbone of scouting reports and drill sheets. When we face a specific opponent, I annotate a diagram for their primary actions and attach the notes to the corresponding play. We print scouting reports with movement cues and drill sheets for the staff to reproduce the action in live drills. The diagrams show player movement paths, dribble paths, passing lines, and screens and handoffs, plus shot markers for timing. Those pages sit in the scouting binder and in the team drive for quick reference.
Keep a centralized library of diagrams with notes on player movement paths and timing. In CourtSensei, every diagram links to drills and scouting notes, so you can pull a full court diagram for a practice where you want to execute a specific sequence. The library blends printable PDFs for on-floor use with interactive court diagrams for walkthroughs, all organized by play type—dribble paths, passing lines, screens and handoffs, and shot markers. Having this setup keeps the weekly workflow tight and avoids scrambling between plan, whiteboard, and video.
Link diagrams to videos and scouting for a complete workflow
In my weekly plan, every play starts as an accurate court diagram on the interactive board, whether it’s half court for a quick action or full court for a transition. I attach a few concise video clips that show the same motion in a recent game or drill, so the diagram stays concrete. Then I build matching playlists of clips for each play, so players can review the action anywhere—locker room, bus, or post-practice film. That single diagram becomes the hub for execution.
On the tactical whiteboard, we use an interactive court diagram that can show player movement paths, dribble paths, passing lines, screens and handoffs, and shot markers. We switch between half court and full court depending on the action. As we walk through the reps, the visual anchors keep everyone aligned—the point guard knows where to push, wings where to slide, and bigs where to slip.
To prep against opponents, I attach a pair of scouting reports that highlight opponent tendencies and defensive schemes. We pre-script adjustments—a tighter hedge, a different backside rotation, or a new spacing cue—and drop those notes into the diagram. The staff can see the linkage between diagrams, video, and scouting at a glance, which makes weekly prep sharper.
By Friday the toolkit is wired into the plan: diagrams linked to relevant drills, short video clips attached to each play, scouting notes ready to be reviewed, and player playlists shared with the team. We export the diagram as a PDF for assistants and printouts for the film session, then roll into practice with a tighter, more cohesive weekly workflow.

Collaborate with assistants and track weekly progress
Week after week, your plan folds together: you design plays on the tactical whiteboard, pull drills from the library, and attach scouting notes and player playlists for quick access, plus short video clips to review cuts with the team. Share a basketball court diagram for plays via shareable links with your assistants, who can review and annotate on their own devices. Feedback flows fast—spacing tweaks, rotation timing, or cut choices—then you iterate and push the updated diagram back to the team. The tighter the loop, the smoother the week, with every diagram tied to a drill and a scouting note. This keeps your weekly progress visible across the plan, board, and clips.
Annotating changes directly on the diagram library preserves a clear version history. When an assistant suggests a tweak on a half court diagram for a read, you’ll see the edit and who made it, plus an annotation noting the reason. Whether it’s a full court or half court look, you can adjust player movement paths, dribble paths, passing lines, and the setup of screens and handoffs, then export a fresh PDF for scouting reports and coaches’ meetings.
Use a simple weekly checklist to ensure every basketball court diagram for plays is tested, exported, and reviewed with the team. The checklist covers key elements: player movement paths, dribble paths, passing lines, screens and handoffs, shot markers. After confirming alignment in practice, generate a shareable link and get quick feedback from assistants before locking in the final diagram for the week.
If you build plans like this every week, CourtSensei keeps your drill library, whiteboard, and video clips in one place — try it free.
FAQ
How do I move players on the court?
Start with a clean diagram on the whiteboard, annotate movement paths, and map them to drill sequences in your plan. Emphasize player movement paths and on-court execution so reps mirror the diagram. Label players 1-5, cue ball handlers and defenders, and keep the plan simple so timing stays intact during reps.
What is the difference between Cut and Dribble?
Cut is an off-ball move to create space and open seams; Dribble is ball handling to bend angles or initiate the action. In diagrams, show a short run line for the cut and a separate dribble path when the ball changes hands. Use both in a single play, and keep the distinction clear for practice reps.
What do the different line styles mean?
Line styles indicate actions: solid lines for primary passes and movements, dashed lines for optional reads or off-ball actions, and arrows for direction. Keep a simple line styles system and a clear legend on every diagram so players read actions at a glance during timeouts or drills.
Can I use full court for press breaks?
Yes, but reserve full-court layouts for selective press-break scenarios. Start installs on the half court and only expand to full court when timing and spacing are tight. In your diagrams, show outlet paths, sprint lanes, and where screens or reads occur during the press breaks.
Can I save my play?
Absolutely. Export the diagram to PDF for sharing and drop it into your Practice Plans library. Use a simple shareable link to tie scouting notes and video clips to the diagram, and label players clearly (1-5) so staff can cue actions during reps.
How do you interpret basketball play diagrams?
Start with the legend and identify offensive players (1-5) versus defenders (X). Read the timing marks, connect movements to drills, and watch attached video clips to see how spacing translates to practice. This approach keeps the diagram aligned with your plan and the players’ on-court actions.
